
Receiving a new batch of Custom boxes is always an exciting moment.However, even well-made packaging should be checked carefully after delivery.
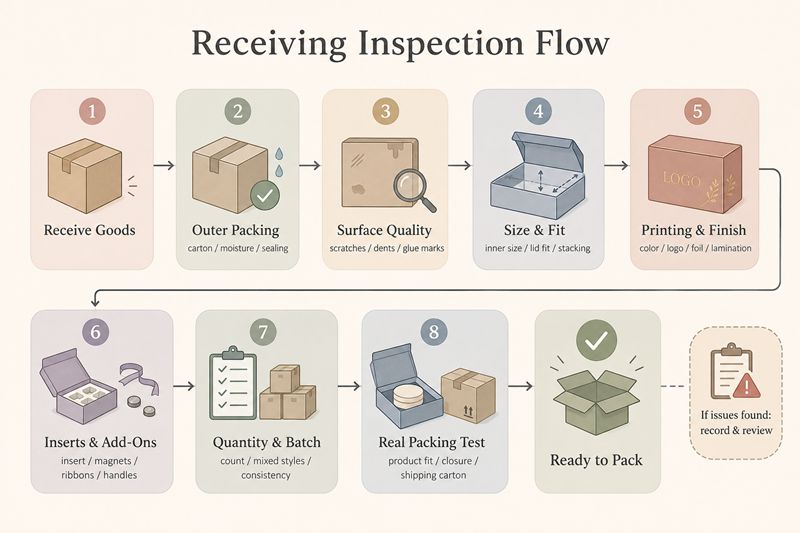
The best time to inspect Custom boxes is immediately after receiving them. Early inspection gives you enough time to confirm quality, separate damaged pieces, communicate with the supplier, and prepare for smooth packing.
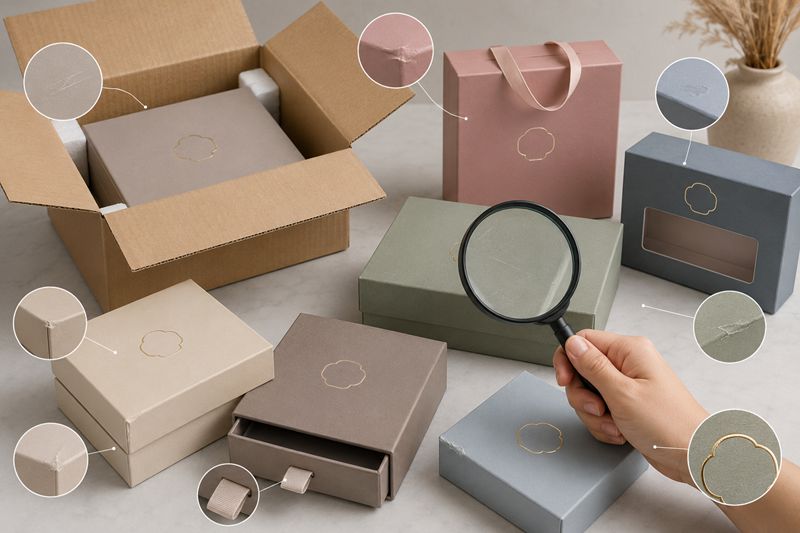
Check the Outer Carton, Packing Condition, and Box Surface
1. Outer Carton Condition
Start the inspection before opening the cartons. Transportation, stacking, moisture, and rough handling may affect the final condition of Custom boxes.
points needed to check:
- Crushed cartons
- Torn edges
- Wet marks
- Opened sealing tape
- Heavy deformation
- Damaged corners
- Bottom pressure marks
If serious damage is found, take photos before unpacking. These records help with supplier communication, internal quality control, or logistics claims.
2. Internal Packing Protection
After opening the carton, check whether the boxes are properly protected inside. Good packing should reduce rubbing, sliding, squeezing, and surface damage during transport.
| Packing Detail | What to Check |
| Protective Bag | Prevents dust, scratches, and fingerprints |
| Foam Sheet | Reduces friction between boxes |
| Paper Wrapping | Protects delicate surfaces |
| Separator | Prevents boxes from pressing against each other |
| Layered Carton Packing | Improves stability during shipping |
Premium rigid boxes, especially with matte lamination, foil stamping, textured paper, or soft-touch finish, usually need better inner protection.
3. Surface Inspection Areas
The box surface is the first thing customers notice. Scratches, stains, glue marks, dents, color rubbing, or broken corners can lower the perceived product value.
- Outer Paper: Scratches / Stains / Wrinkles
- Corners: Dents / Cracks / Peeling
- Lid & Base: Marks / Dirt / Color Difference
- Logo Area: Misalignment / Blur / Ink Spots
- Foil Finish: Missing Foil / Rough Edges
- Lamination: Bubbles / Peeling / Cloudiness
- Window: Glue Overflow / Film Scratches
- Ribbon / Handle: Loose / Stained / Uneven
- Bottom Panel: Pressure Marks / Unstable Base
4. Material and Finishing Details
| Finish | Check Points |
| Matte Paper | Scratches / Fingerprints / Dust |
| Glossy Lamination | Bubbles / Peeling / Cloudiness |
| Textured Paper | Broken Grain / Stains |
| Foil Stamping | Alignment / Missing Foil / Rough Edges |
| Embossing / Debossing | Clear Pressure / No Cracking |
| Spot UV | Accurate Position / Clean Gloss |
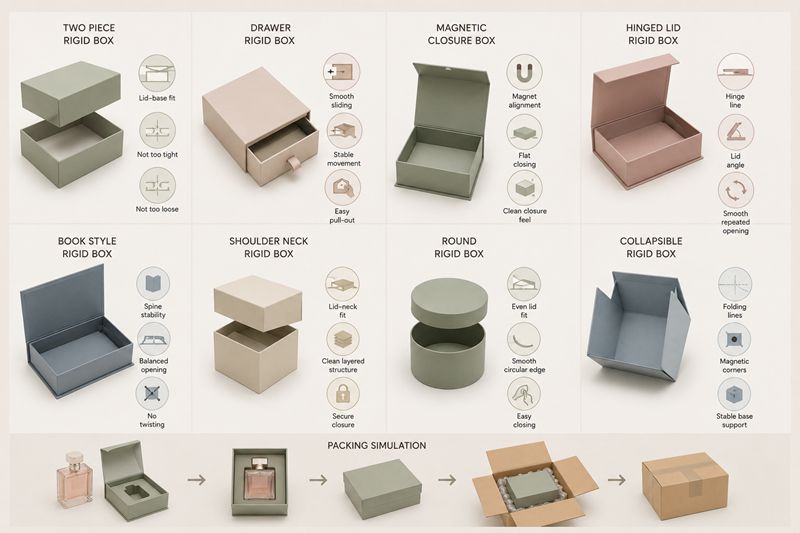
Check Size, Structure, and Product Fit
Use a real product sample for testing. Position the goods inside the packaging exactly as end customers receive the finished package. Check whether the product sits flat, stays centered, and can be removed easily. The fit should feel secure, but not forced.
Different Custom box structures need different inspection methods:
| Box Type | Key Check Points |
| Two Piece Rigid Box | Lid-base fit / Not too tight / Not too loose |
| Drawer Rigid Box | Smooth sliding / Stable movement / Easy pull-out |
| Magnetic Closure Box | Magnet alignment / Flat closing / Clean closure feel |
| Hinged Lid Rigid Box | Hinge line / Lid angle / Smooth repeated opening |
| Book Style Rigid Box | Spine stability / Balanced opening / No twisting |
| Shoulder Neck Rigid Box | Lid-neck fit / Clean layered structure / Secure closure |
| Round Rigid Box | Even lid fit / Smooth circular edge / Easy closing |
| Collapsible Rigid Box | Folding lines / Magnetic corners / Stable base support |
If your boxes will be shipped with products inside, run a simple packing simulation. Place the product inside the box, close the box, put it into the outer carton, and check whether everything remains stable. Through this step, you can assess whether the box satisfies both visual standards and functional demands.
Check Printing, Color, Logo, and Finishing Details
1. Color Consistency
Compare the received Custom boxes with the approved sample, color proof, or final design file. Check the color under both natural and indoor light to make sure the tone is stable, the batch color is consistent, and the brand color is accurately presented.
Even slight color differences can affect the overall packaging image, especially for cosmetics, jewelry, tea, chocolate, perfume, and gift packaging.
2. Logo and Printing Accuracy
The logo should be clean, sharp, centered, and correctly positioned.Small logos, thin lines, and delicate patterns need extra attention because small printing errors are more visible in close-up photos.
- Logo: Clear / Sharp / Centered
- Text: Readable / No Blur / No Broken Lines
- Pattern: Accurate / No Color Bleeding
- Details: Clean Edges / No Ink Spots
- Position: No Shifting / Correct Alignment
3. Finishing Details
| Finish | Key Check Points |
| Foil Stamping | Complete foil / Clean edge / Even shine |
| Embossing | Clear raised effect / No paper cracking |
| Debossing | Clear recessed effect / No distortion |
| Spot UV | Accurate position / Clean glossy area |
| Matte Lamination | No peeling / No bubbles / No wrinkles |
| Gloss Lamination | Smooth surface / Even reflection |
| Soft-Touch Film | Clean touch / No scratches |
| Anti-Scratch Film | No marks / Stable coating |
4. Window Area Check
For boxes with die-cut windows or film patching, check whether the window edge is clean, the film is firmly attached, and there is no glue overflow, scratching, or loose corner. The window should display the product clearly while keeping food, cosmetics, candles, or personal care items clean and protected.
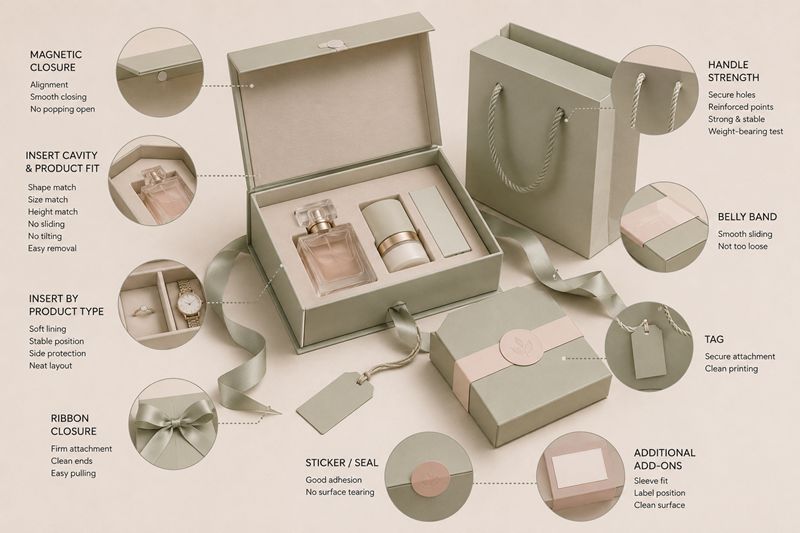
Check Inserts, Closures, Handles, and Other Add-Ons
Many Custom boxes include inserts, magnets, ribbons, handles, belly bands, tags, trays, EVA foam, paperboard holders, velvet lining, or satin lining. These details should protect the product, improve presentation, and make the unboxing smoother.
1. Insert Fit and Protection
Inserts should be checked first because they directly affect product stability. Put the genuine merchandise into the inner compartment and inspect the fit between the cavity and the product’s outline, overall size and height.
- Cavity Fit: Shape Match / Size Match / Height Match
- Product Stability: No Sliding / No Tilting / No Shaking
- Removal Experience: Easy Lift / Smooth Removal / No Forced Pulling
- Surface Protection: No Scratching / No Pressure Marks
- Layout: Neat / Balanced / Product-Centered
2. Insert Checks by Product Type
- Cosmetics & Skincare:Bottles Upright / Accessories Fixed / Clean Layout
- Jewelry & Watches:Soft Lining / No Scratching / Stable Position
- Candles & Perfume:Side Protection / Weight Support / Less Movement
- Chocolate & Tea Gifts:Item Separation / Neat Display / Gift-Ready Look
- Electronics & Accessories:Cable Space / Manual Space / No Pressure on Product
3. Closure Function
Closures should feel smooth, secure, and easy to use. They should not make the box difficult to open or reduce the premium feel.
- Magnetic Closure:Alignment / Smooth Closing / No Popping Open
- Ribbon Closure:Firm Attachment / Clean Ends / Easy Pulling
- Friction-Fit Closure:Not Too Tight / Not Too Loose / Stable Fit
- Metal Buckle:Firm Fixing / No Scratches / No Sharp Edges
4. Handle Strength
If the box includes ribbon, rope, PU leather, paper rope, or woven handles, test the handle with the actual product weight. Check the holes, knots, eyelets, glue points, reinforced areas, pulling stability, and weight-bearing strength to make sure the handle stays secure after packing.
5. Add-On Fit
| Add-On | Check Points |
| Belly Band | Smooth sliding / Not too loose |
| Sleeve | Correct fit / Easy removal |
| Label | Accurate position / Clean surface |
| Sticker / Seal | Good adhesion / No surface tearing |
| Tag | Secure attachment / Clean printing |
Check Quantity, Batch Consistency, and Real Packing Performance
The final point is about quantity and consistency. After checking visible quality and structure, you need to confirm whether the full batch matches the order requirements.
1. Quantity Check
- Carton count
- Packing list
- Pieces per carton
- Size differences
- Color differences
- Box structure differences
- Special version separation
2. Batch Consistency
| Sampling Position | Check Purpose |
| Top Layer | Surface pressure / Visible damage |
| Middle Layer | Normal batch quality |
| Bottom Layer | Compression / Corner damage |
| Different Cartons | Color and structure consistency |
3. Packing Performance Check
- Product Placement: Fast / Safe / Stable
- Insert Use: Easy Packing / Efficient / No Delay
- Lid Closing: Natural / Flat / No Bulging
- Ribbon / Handle: No Interference / Easy Use
- Product Stability: No Movement / No Shaking / Secure Fit
- Shipping Carton Fit: Correct Size / Good Protection
- Photo Effect: Clean / Premium / Gift-Ready
- Unboxing Experience: Smooth / Comfortable / Impressive
Common Problems You May Find After Receiving Custom Boxes
Not every small variation means the batch is unusable. Custom packaging production involves materials, printing, hand assembly, finishing, and packing, so minor tolerances may exist.
| Type | Key Issues | Impact |
| Surface | Scratches / Dents / Stains / Glue | Appearance |
| Structure | Loose Lid / Tight Fit / Weak Hinge | Usability |
| Printing | Color Shift / Logo Misalignment / Missing Foil | Brand Image |
| Packing | Mixed Styles / Missing Pieces / Damaged Cartons | Fulfillment |
| Tolerance | Minor Material / Printing / Assembly Variation | Acceptable If Usable |
How Many Boxes Should You Check?
For small orders, you may check every box, especially if the boxes are used for high-value products or important product launches. For larger orders, use sample inspection. Select boxes from different cartons and different positions inside the cartons. Do not check only the easiest carton on top.
It is better to inspect more boxes at the beginning than to discover problems during final packing for premium product packaging.
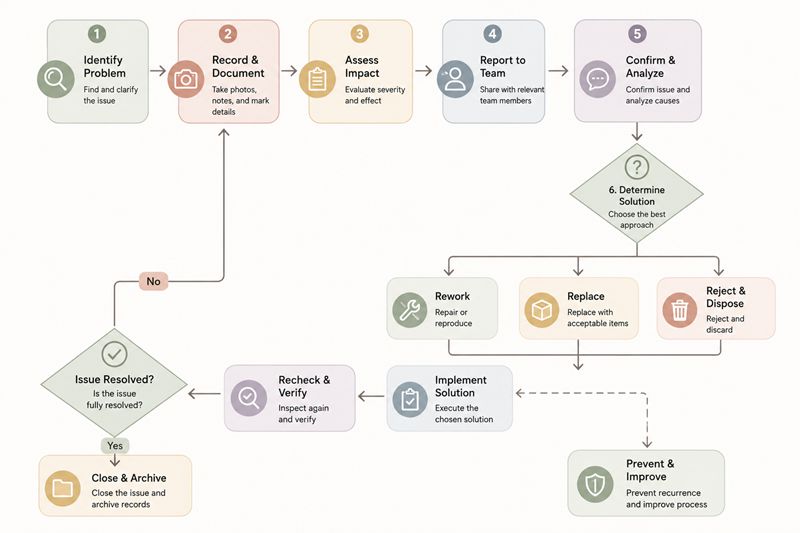
Recommended Actions Upon Discovering Issues
If you find problems after receiving Custom boxes, keep the process organized.A professional Custom packaging supplier will usually need this information to review the issue efficiently.
- Separatingthe affected boxes from the good boxes
- Takingclear photos and videos
- Comparingthe issue with the approved sample or confirmed design
- Establish early communication with your supplier