
A compact and brush set looks simple until the handle crosses the powder case or the bristles press against the lid. Thoughtful makeup box packaging gives each item clear space.
A Compact and Brush Need Different Kinds of Support
A powder compact is relatively flat, while a makeup brush combines a narrow handle with a wider, softer head. Placing both in one cavity rarely provides an ideal fit.
The compact needs a stable base and accessible edges. The brush requires a defined holding position, with enough freedom around its bristles to maintain their natural shape.
Start by measuring the actual products:
- Compact Width: Include hinges and decorative edges.
- Compact Height: Measure the complete closed casing.
- Brush Length: From handle end to bristle tips.
- Handle Diameter: Check tapered or curved sections.
- Brush Head Width: Measure the natural bristle spread.
- Product Weight: Record each item’s finished weight.
Do not rely on the compact’s advertised diameter alone. Square casings, raised lids, and protruding hinges may change the cavity shape required for a secure fit.
For custom cosmetic rigid boxes, Seven Rainbow offers adjustable box dimensions, fitted inserts, and different presentation structures for makeup products and beauty tools.
Which Layout Keeps the Brush Handle Clear?
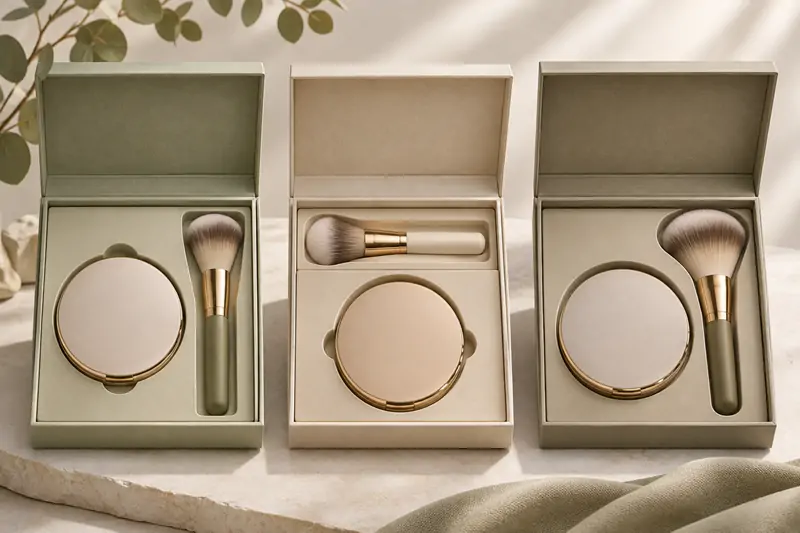
Positioning the brush diagonally across the compact may appear space-efficient in a drawing. Once packed, however, the handle can touch the compact lid or obstruct product removal.
A better starting point is to divide the interior into two defined zones. The arrangement of the products may vary, but each item should have its own support rather than relying on adjacent products.
Three layouts worth comparing
| Side-by-Side | Compact beside a straight brush channel. Suitable for most standard sets. |
| Stacked Arrangement | Brush above or below the compact, with separate retaining areas. |
| Offset Layout | Brush head positioned beyond the compact’s widest point to reduce interference. |
For a long powder brush, a side-by-side arrangement often provides the clearest display. The handle stays straight, while the compact remains accessible from its outer edges.
Shorter brushes may fit beneath the compact without increasing the box width. Check the brush head separately, since it usually occupies more space than the handle.
What About Two Brushes in One Set?
When a gift set includes both a powder brush and a smaller blending brush, placing their handles together can save space. However, the heads should remain separated.
- Parallel Handles: Individual retaining grooves.
- Opposite Directions: Brush heads at different ends.
- Separate Channels: Dedicated space for each tool.
The best arrangement depends on the brush lengths and head widths. The inserts should prevent movement without forcing the two handles into direct contact.
A Stable Compact Should Still Be Easy to Remove
A compact can move inside a large recess, but an overly tight cavity creates another problem: customers may struggle to lift the product without pulling against its hinge.
For cosmetic packaging boxes, the supporting cavity should follow the casing rather than the powder pan inside. Its depth and contact points need to match the closed compact.
Important fitting details include:
- Cavity Shape: Round, square, or irregular casing.
- Base Support: A level surface beneath the compact.
- Hinge Clearance: No pressure on protruding components.
- Finger Notch: Convenient access along an exposed edge.
A shallow recess can make the compact more visible, while a deeper cavity may improve positioning. Neither approach is automatically better without testing the actual product.
If the compact has a mirrored lid, check its full closed thickness and any raised decoration. The insert should hold the casing securely without pressing on fragile features.
Seven Rainbow’s custom two piece rigid boxes allow different internal depths and insert arrangements. A removable lid also provides straightforward access to both products.
Keep Brush Heads Away From Tight Cavities
A brush handle can fit neatly into a narrow channel, but the same channel should not continue around the bristles. Tight openings may compress or distort the brush head.
The wider head needs sufficient clearance, particularly for fluffy powder brushes. Flat, angled, and rounded heads may each require a different cavity profile.
Consider these support options:
- Handle Groove: Keeps the brush aligned.
- Retaining Tabs: Hold the handle at selected points.
- Open Head Recess: Leaves the bristles uncompressed.
- Protective Sleeve: Accommodates a supplied brush-head cover.
Place the retaining points along the handle rather than gripping the bristles. The ferrule—the metal section connecting the handle and brush head—should not be squeezed unnecessarily.
The American Academy of Dermatology’s makeup brush cleaning guidance explains why protecting the brush-head connection matters, including how excessive moisture exposure can loosen the adhesive.
Although this guidance concerns cleaning rather than packaging design, it highlights the importance of caring for the brush head and connection. The insert should avoid unnecessary stress on these components.
Choosing an Insert That Holds Both Products
A single insert can accommodate the compact and brush, but different areas may need different forms of support. Material selection should follow the product arrangement, not appearance alone.
Seven Rainbow offers EVA, sponge foam, paperboard, molded pulp, and PET tray options for its cosmetic rigid boxes. Each can be customized to create product cavities or separating sections.
| Insert Material | Compact Area | Brush Area |
| EVA Foam | Shaped supporting cavity | Defined handle groove |
| Sponge Foam | Cushioned resting surface | Softer retaining points |
| Paperboard | Folded support platform | Tabs and dividers |
| Molded Pulp | Formed product recess | Separate tool channel |
| PET Tray | Shaped compact compartment | Contoured handle position |
For cardboard makeup packaging, paperboard dividers can separate the products without creating an excessively thick insert. A shaped EVA recess may be preferable when the compact has unusual edges.
Another option is to combine materials. For example, an EVA base could hold the compact, while a paperboard section provides separate support for the brush handle.
Let the Box Structure Follow the Product Arrangement

Once the insert layout is established, choosing the outer box becomes more straightforward. A wide presentation area suits side-by-side arrangements, while compact layouts may benefit from a different opening structure.
The cosmetic rigid box range from Seven Rainbow includes magnetic, lid-and-base, drawer, shoulder-neck, hinged, and foldable designs. Several can accommodate makeup kits with customized inserts.
Lid-and-Base Boxes for Direct Access
A removable lid exposes the compact and brush simultaneously. This works well when both products are arranged in one flat layer with separate retaining positions.
Magnetic Boxes for Coordinated Gift Sets
A hinged magnetic lid creates a connected presentation. Keep raised brush heads below the closing clearance and avoid positioning the handle against the hinge-side wall.
Drawer Boxes for Sliding Displays
A custom drawer rigid box offers a different opening experience. Both products must stay below the outer sleeve, particularly when the brush head sits above its handle channel.
For luxury cosmetic packaging boxes, the best structure is not necessarily the most elaborate. A practical opening arrangement should allow customers to remove each product independently.
Example: Foam Insert Design for a Round Compact and Powder Brush
Consider a hypothetical makeup gift set containing a round powder compact and a medium-length brush. The compact has a raised lid, while the brush features a tapered handle.
A side-by-side layout gives each product a dedicated area. The compact sits in a circular recess, with the brush positioned in a straight channel beside it.
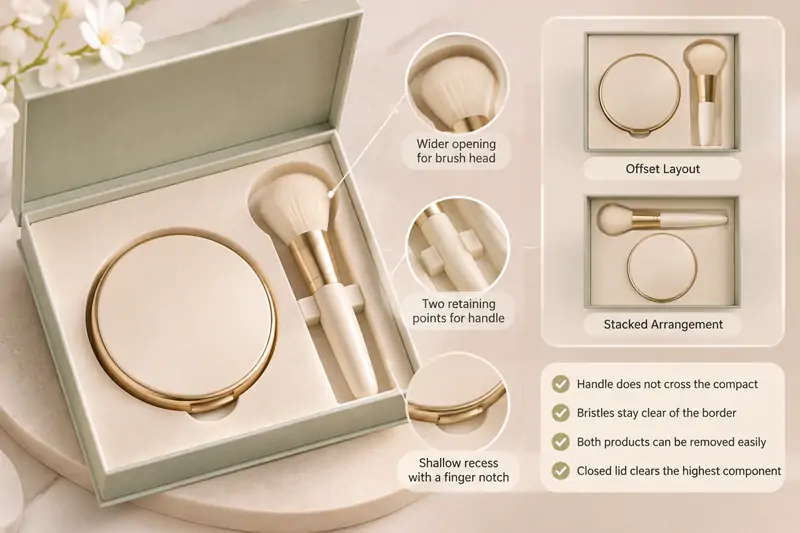
Here, the compact receives a shallow recess with a finger notch. The brush handle sits in two retaining points, while the head remains inside a wider opening.
An offset arrangement may reduce the required box width if the brush head extends beyond the compact’s upper edge. However, check that the product remains balanced inside the finished box.
Before finalizing the layout, confirm:
- The brush handle does not cross the compact cavity.
- The bristles stay clear of the separating border.
- Both products can be removed independently.
- The closed lid clears the highest component.
Branding Should Complement the Interior, Not Crowd It
Branding should unify the compact-and-brush set without competing with the display. Seven Rainbow offers color matching, specialty papers, foil stamping, embossing, debossing, and UV finishes for custom printed cosmetic boxes.
Keep the logo on the outer lid and interior colors restrained. Place product cards or instructions inside a lid pocket, away from the brush channel and its delicate, exposed bristles.
What Changes When Several Compact Shades Share One Box?
Brands often offer multiple compact shades with identical casing dimensions. In that situation, one outer box and insert design may accommodate the entire shade collection.
However, changing the brush length or head shape can affect the layout even when the compact remains unchanged. New accessories should be checked against the approved insert.
For custom cosmetic boxes wholesale, this distinction matters when preparing quotations. Shared exterior components may simplify production, while brush-specific retaining areas require separate specifications.
A practical approach is to standardize the box structure and compact cavity first. Then confirm which brush variations can use the same holding arrangement without changing the insert.
Test the Finished Set Before Approving Bulk Production
Digital layouts cannot fully predict how a brush behaves when the box is lifted. The handle may rotate, or the bristles may touch a divider despite appearing clear in drawings.
Use finished compacts and brushes for sample approval. Substitute products may have different weights, hinges, ferrules, and bristle shapes that affect the packaging fit.
Focus the sample review on actual handling:
- Product Stability: Does either item shift when lifted?
- Brush Alignment: Does the handle remain in its channel?
- Head Protection: Are the bristles free from compression?
- Compact Access: Can the casing be lifted without force?
- Closing Clearance: Does the lid close without contact?
A change in insert material or arrangement may also affect shipping performance. The International Safe Transit Association’s retesting guidance identifies changes to products, interior packaging, and materials as reasons to reassess package testing.
For wholesale orders, approve one complete sample before confirming the remaining production quantities. Check the chosen outer carton arrangement as well as the individual gift box.
Send the Manufacturer a Complete Packaging Brief

The final quotation should reflect the actual compact, brush, insert, and exterior box. Providing only overall dimensions may leave important fitting details unresolved during sampling.
For custom makeup packaging, prepare a concise specification covering:
| Item | Information Required |
| Compact | Dimensions, hinge, surface details |
| Brush | Length, handle shape, bristle width |
| Insert | Material, cavity positions, retention |
| Box | Style, internal dimensions, printing |
| Order | Quantity, SKU variations, delivery |
Physical samples are particularly useful when the brush handle has an unusual shape or the compact features a raised decorative lid. These details are difficult to judge from photographs.
Seven Rainbow’s custom cosmetic rigid box solutions allow buyers to discuss box structures, insert materials, surface finishes, and sample requirements together before wholesale production.
A compact-and-brush set works best when each product has its own support. Keep handles straight, protect bristles, and confirm the finished layout before bulk production.