
The production of a rigid box may look simple from the outside, but it involves several precise steps, including material selection, printing, finishing, board cutting, forming, wrapping, assembly, inspection, and packing. A reliable rigid box manufacturer must control every step carefully to ensure the box looks clean, opens smoothly, and protects the product properly.
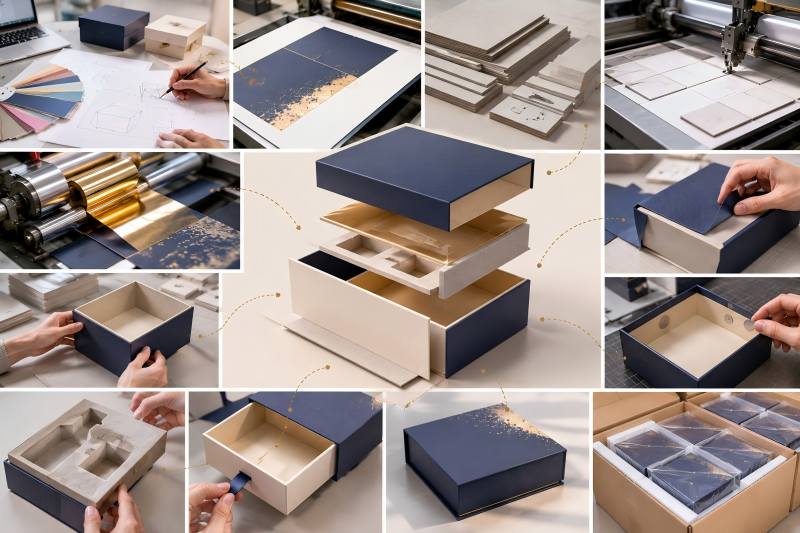
Step 1: Confirm the Box Design
The first step is to confirm the box design. Before production starts, the customer and packaging team need to decide the box structure, size, material, color, printing method, finishing process, and insert type.
Important design details include:
| Design Item | Key Consideration |
| Box size | Must match the product dimensions |
| Box structure | Lid-base, drawer, magnetic, book-style, etc. |
| Board thickness | Affects strength, weight, and cost |
| Wrapping paper | Affects appearance and printing quality |
| Surface finishing | Foil stamping, embossing, lamination, spot UV |
| Insert | Paper, EVA, foam, velvet, satin, molded pulp |
| Opening method | Lift-off lid, ribbon pull, magnetic closure, drawer pull |
At this stage, the design should balance appearance, protection, cost, and production feasibility. A beautiful design may not always be easy to manufacture, especially if the box has complex corners, special materials, or tight tolerances.
Step 2: Make the Dieline and Sample
After confirming the design direction, the packaging engineer creates a dieline. A dieline is a flat technical drawing that shows the cutting, folding, wrapping, and assembly structure of the box.
The dieline helps confirm:
- Box dimensions
- Board layout
- Wrapping paper size
- Fold lines
- Glue areas
- Magnet position
- Ribbon position
- Insert position
After the dieline is ready, a sample is usually made before mass production. The sample allows the customer to check the actual size, opening experience, color, material, and product fit.
Sampling is very important because small design errors can become serious problems in mass production. For example, if the inner size is too tight, the product may not fit. If the lid does not fit securely, the box may lose its premium feel. If the board is too thick, the corners may look bulky.
Step 3: Select the Board Material
The board is the main structural material of a rigid box. Grey chipboard is commonly chosen for its strength, stability, and reasonable cost.
Common board thicknesses include:
| Board Thickness | Suitable Use |
| 1.0 mm | Small lightweight boxes |
| 1.2–1.5 mm | Small to medium gift boxes |
| 1.8–2.0 mm | Cosmetic boxes, magnetic boxes, retail boxes |
| 2.5 mm | Larger luxury boxes, electronics packaging |
| 3.0 mm or above | Heavy-duty gift boxes and large premium boxes |
The right board thickness depends on the box size and product weight. Thicker board gives better strength and a more premium feel, but it also increases cost and makes wrapping more difficult. For many medium-sized rigid boxes, 1.5 mm to 2.0 mm grey chipboard is a common choice.
Step 4: Prepare the Wrapping Paper
Rigid boxes usually do not show the grey board directly. The outer surface is covered with wrapping paper. This paper can be printed, laminated, textured, or decorated according to the brand design.
Common wrapping materials include:
| Wrapping Material | Main Feature |
| Art paper | Good for full-color printing |
| Coated paper | Smooth surface and sharp print quality |
| Kraft paper | Natural and eco-friendly appearance |
| Specialty paper | Premium texture and unique surface |
| Textured paper | Tactile and luxury feeling |
| Black card paper | Elegant and high-end style |
| Pearl paper | Soft shimmer and decorative effect |
| Metallic paper | Bright and festive luxury look |
The wrapping paper must be suitable for folding and gluing. If the paper is too thick or too stiff, it may crack at corners or create uneven edges. If it is too thin, glue marks or board texture may show through.
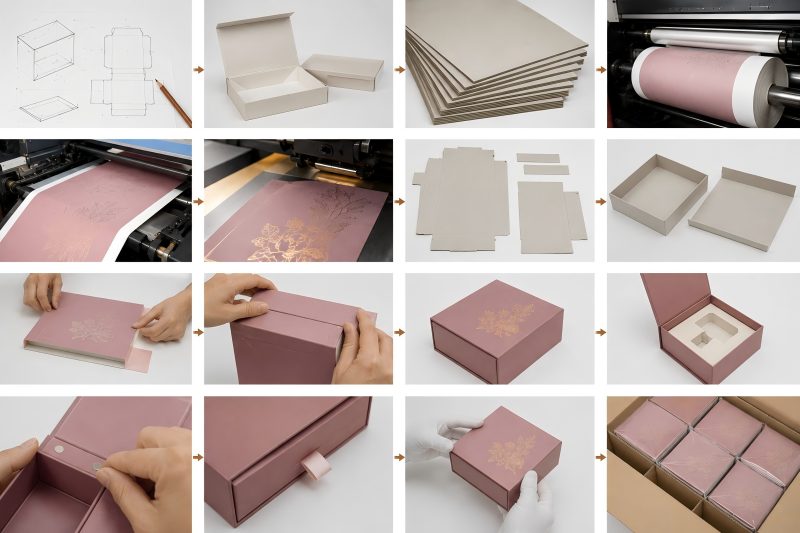
Step 5: Printing the Design
The design is usually printed on the wrapping paper before it is mounted onto the rigid board. The printing method depends on order quantity, artwork complexity, material, and budget.
Common printing methods include:
| Printing Method | Suitable For |
| Offset printing | High-quality full-color packaging |
| Digital printing | Samples and small orders |
| Screen printing | Simple logos and strong color coverage |
| UV printing | Glossy or special surface effects |
| Flexographic printing | Simple patterns and large-volume production |
| Gravure printing | Very large production runs |
Offset printing is one of the most common options for custom rigid boxes because it provides sharp details, good color performance, and stable results in mass production.
Step 6: Apply Surface Finishing
After printing, surface finishing may be added to improve appearance and protection. These treatments enhance the box’s appearance and strengthen overall brand recognition.
Common finishing options include:
| Finishing Process | Effect |
| Matte lamination | Elegant, smooth, non-glossy surface |
| Gloss lamination | Bright, shiny, vivid color effect |
| Soft touch lamination | Velvety luxury hand feel |
| Anti-scratch lamination | Better resistance to scuffs |
| Spot UV | Selective glossy accent effects |
| Foil stamping | Metallic logo or decoration |
| Embossing | Raised logo or pattern |
| Debossing | Pressed-in logo or pattern |
For luxury boxes, finishing is often one of the most important details. A simple black box with gold foil and soft touch lamination can look much more premium than a box with complex printing but poor finishing.
Step 7: Cut the Grey Board
Once the materials are ready, the grey board is cut into the required pieces. Depending on the box structure, the board may be cut into panels for the lid, base, side walls, spine, or drawer section.
Cutting must be accurate because rigid boxes require clean corners and consistent dimensions. Small dimensional errors can affect lid fit and box shape.
For example, if the base is slightly too large, the lid may be too tight. If it is slightly too small, the lid may feel loose. Good cutting accuracy is essential for a premium rigid box.
Step 8: Cut and Crease the Wrapping Paper
The printed and finished wrapping paper is also cut according to the dieline. It may include extra margins for wrapping around board edges.
For some box styles, the wrapping paper also needs creasing. Creasing helps the paper fold neatly around corners and edges. Without proper creasing, the surface may wrinkle, crack, or form uneven corners.
This step is especially important for textured paper, thick paper, laminated paper, and specialty paper.
Step 9: Form the Box Structure
After the board pieces are cut, they are formed into the box shape. Depending on the box type, the boards may be positioned and glued by machine or by hand.
For lid and base boxes, the lid and base are formed separately. For book-style magnetic boxes, the structure includes a cover panel, spine, inner tray, and magnet positions. For drawer boxes, the outer sleeve and inner tray are made separately.
Accurate forming ensures that the box has straight edges, clean corners, and a stable shape.
Step 10: Wrap the Box
Wrapping is one of the most important steps in rigid box production. The printed wrapping paper is glued and applied around the formed board structure. The paper must be aligned properly, pressed smoothly, and folded neatly at the edges and corners.
Good wrapping should have:
- Clean corners
- Smooth surface
- No bubbles
- No wrinkles
- No visible glue marks
- Neat edge folding
- Accurate logo position
This step directly affects the final appearance. Even if the printing is beautiful, poor wrapping can make the box look low quality.
Step 11: Add Magnets, Ribbons, or Accessories
Many rigid boxes include accessories such as magnets, ribbons, handles, windows, hinges, or pull tabs. These parts are usually added during the forming or assembly stage.
Common accessories include:
| Accessory | Function |
| Magnet | Creates a secure closure |
| Ribbon | Helps open drawer boxes or gift boxes |
| Handle | Makes the box easier to carry |
| Window | Shows the product inside |
| Metal lock | Adds a luxury or secure feeling |
| Elastic band | Keeps the box closed |
For magnetic boxes, magnet position must be very accurate. If the magnets are not aligned, the box may not close properly.
Step 12: Make and Place the Insert
The insert secures and protects products inside the box. The insert can be made from paper, cardboard, EVA, foam, velvet, satin, molded pulp, or plastic tray material.
Different products require different inserts. Perfume bottles often use EVA or foam inserts. Jewelry boxes often use velvet or fabric inserts. Food gift boxes may use cardboard partitions or molded pulp inserts.
A good insert should fit the product securely and match the overall box style.
Step 13: Quality Inspection
Rigid boxes are inspected before final packing. This step checks both appearance and function.
Common inspection points include:
- Box size accuracy
- Color consistency
- Printing quality
- Surface scratches
- Corner quality
- Glue marks
- Lid and base fit
- Magnet closure strength
- Insert fit
- Cleanliness
Quality control is especially important for luxury packaging because customers expect a clean and premium presentation.
Step 14: Packing and Shipping
After quality checks, boxes are prepared for shipment. Packaging must prevent scratches, dust, deformation, and moisture during transportation.
Rigid boxes are usually packed in cartons with protective materials. For high-end boxes, each box may be placed in a polybag or separated with paper to avoid surface damage.
For collapsible rigid boxes, flat packing can reduce shipping volume. For non-collapsible rigid boxes, the shipping volume is larger, but the structure is stronger and ready to use.
Rigid box production is a detailed process that includes design confirmation, dieline creation, sampling, material selection, printing, finishing, board cutting, forming, wrapping, accessory installation, insert placement, inspection, and packing.
Board thickness determines strength. Wrapping paper affects appearance. Printing and finishing enhance brand appeal, inserts secure and display products, and quality control ensures a clean, functional box that meets customer expectations.