
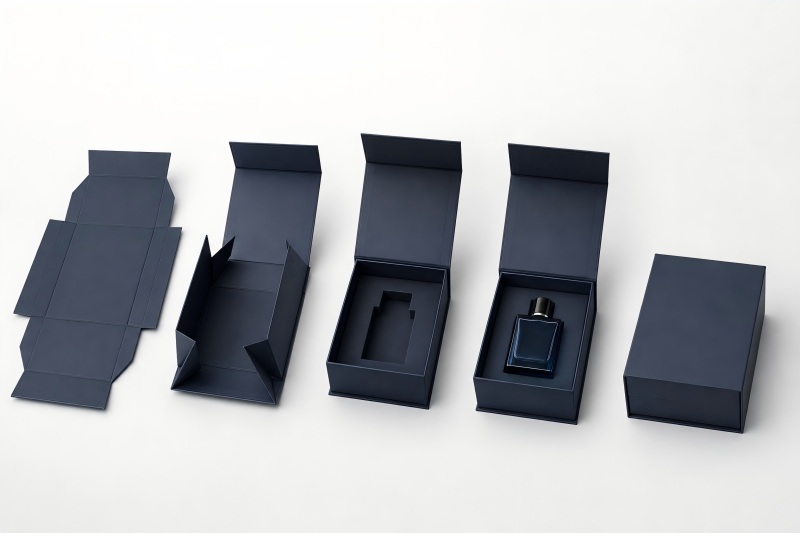
Assembling a collapsible rigid box is usually simple. The basic process includes laying the box flat, identifying the fold lines, lifting the side panels, securing the corners, placing the insert, adding the product, and closing the lid or flap.
When assembled correctly, a collapsible rigid box offers the same premium appearance as a traditional rigid box, while providing better advantages in shipping, storage, and packaging flexibility.
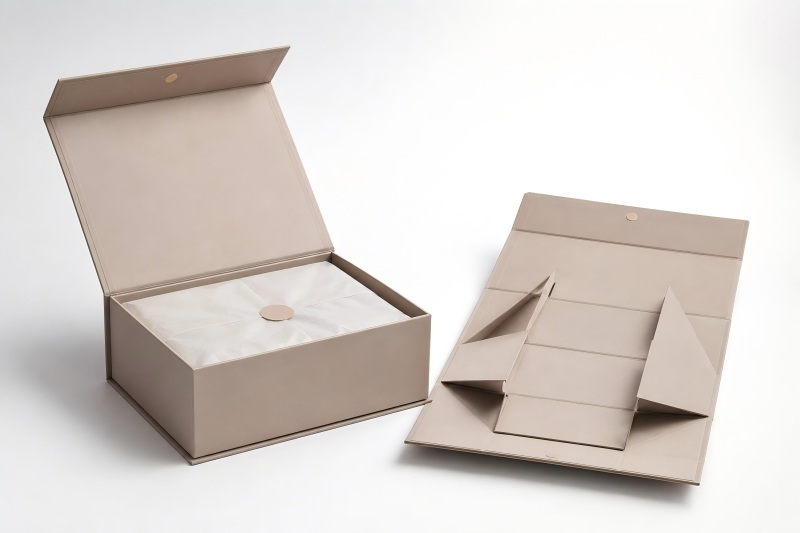
Main Parts of a Collapsible Rigid Box
Before assembly, it is helpful to understand the basic parts of the box.
| Part | Function |
| Base panel | Forms the bottom of the box |
| Side panels | Fold upward to create the box walls |
| Corner panels | Help connect and strengthen the corners |
| Lid or flap | Covers and closes the box |
| Magnetic pieces | Keep the box closed or help fix the shape |
| Adhesive strips | Lock panels into position |
| Insert | Secures the product inside the box |
Not every collapsible rigid box has the same structure. Some are magnetic book-style boxes. Some are lid-and-base boxes. Others may use drawer structures or special locking panels. However, the basic assembly logic is usually similar: open, fold, align, fix, place product, and close.
Preparation Before Assembly
Before you start assembling the box, check the box carefully. A few simple checks can help avoid damage and improve the final appearance.
First, make sure the box is placed on a clean and flat surface. Since rigid boxes often use decorative paper, textured paper, or laminated surfaces, dirt or sharp objects may scratch the surface.
Second, check whether all panels are complete and undamaged. Look at the corners, fold lines, magnetic areas, and adhesive strips. If the box has a custom insert, make sure the insert fits the box size.
Third, wash and dry your hands or wear clean gloves if the box has a light-colored or luxury surface. Fingerprints, dust, and oil marks can affect the packaging appearance, especially on matte, soft-touch, or specialty paper finishes.
Step 1: Lay the Box Flat
Start by placing the collapsible rigid box flat on the table. The outer surface should usually face downward, and the inner surface should face upward. This allows you to see the folding panels and crease lines clearly.
At this stage, the box may look like a flat board with several connected panels. You should be able to identify the bottom panel, side walls, corner panels, and lid or flap.
Do not pull or bend the panels too quickly. Although the box is designed to fold, excessive force may damage the paper wrapping or weaken the crease lines.
Step 2: Identify the Folding Lines
The folding lines are the pre-creased areas that allow the rigid board to bend smoothly. These lines show where each panel should be folded.
Gently press along the crease lines with your fingers. This helps the panels fold more naturally and reduces resistance during assembly. For thicker rigid boxes, this step is especially useful because the board may feel slightly stiff at first.
Gently guide the fold without applying excessive pressure to the board.
Step 3: Lift the Side Panels
Next, lift the side panels upward from the base panel. Usually, the long side panels should be folded first, followed by the short side panels. The assembly sequence may differ based on the specific box design.
Raise each panel slowly until it stands at a right angle to the bottom panel. The side panels should form the basic box wall structure.
At this stage, the box is not fully stable yet. Hold the panels gently to keep them in position while you move to the next step.
Step 4: Fold the Corner Panels Into Place
Most collapsible rigid boxes have corner panels or small folding flaps. These parts help connect the side walls and create a firm box shape.
Fold the corner panels inward or outward according to the structure. Some corner panels are designed to overlap inside the box. Others may lock into hidden slots or attach to magnetic areas.
Make sure the corners are aligned neatly. Poor corner alignment can make the finished box look uneven or loose. For premium packaging, clean corners are very important because they directly affect the customer’s first impression.
Step 5: Secure the Panels
After the side panels and corner panels are in position, secure them using the box’s built-in fixing method. Different collapsible rigid boxes may use different systems.
Magnetic Fixing
Some boxes use hidden magnets inside the panels. When the panels are folded correctly, the magnets automatically connect and hold the structure in place. This method is clean, reusable, and popular for luxury gift boxes.
Adhesive Strip Fixing
Some boxes use double-sided adhesive strips. The sequence may differ depending on the box design. This creates a strong fixed structure, but it is usually designed for one-time assembly.
Locking Tab Structure
Some designs use paperboard tabs, slots, or folding locks. Insert the tabs into the correct slots and press gently until the panels stay in place.
No matter which method is used, avoid forcing the panels. If something does not fit, check the folding direction and panel order before pressing harder.
Step 6: Check the Box Shape
Once the panels are secured, check the overall box shape. The box should stand evenly on the table. The corners should be straight, and the side walls should not lean inward or outward.
You can gently press the corners and bottom edges to improve alignment. If the box uses adhesive strips, press the adhesive areas for a few seconds to make sure they bond well.
A well-assembled collapsible rigid box should feel solid and stable, similar to a traditional rigid box.
Step 7: Place the Insert Inside
If the box includes an insert, place it inside after the main box structure is complete. Inserts are used to hold and protect the product. They also improve the unboxing experience.
Common insert materials include:
| Insert Material | Common Use |
| EVA foam | Jewelry, watches, electronics, perfume |
| Paperboard insert | Cosmetics, gift sets, accessories |
| Molded pulp | Eco-friendly product packaging |
| Sponge insert | Fragile or high-value items |
| Satin or fabric lining | Luxury gifts and premium presentation |
Ensure the insert lies flat inside the box. If the insert is not aligned, the product may look unstable or unprofessional.
Step 8: Place the Product Inside
After the insert is ready, place the product inside the box. The product should fit securely without too much movement. If the product shakes easily, the insert may need adjustment.
For fragile items such as perfume bottles, glass products, jewelry, or electronics, product positioning is very important. The item should be centered and well protected.
For gift sets, arrange each item neatly. A clean internal layout makes the packaging look more valuable and improves the customer’s unboxing experience.
Step 9: Close the Lid or Flap
Finally, close the lid or flap. If the box uses a magnetic closure, the lid should close smoothly with a gentle magnetic pull. If the lid does not align properly, check whether the side panels and corners are fully secured.
For book-style collapsible rigid boxes, the lid usually folds over the base and closes with hidden magnets. For lid-and-base structures, place the top lid over the bottom base carefully.
The closing experience should feel smooth, not forced. A premium box should open and close easily while still feeling firm.
Common Assembly Mistakes to Avoid
Even though collapsible rigid boxes are easy to assemble, some mistakes may affect the final result.
Folding in the Wrong Direction
If a panel is folded in the wrong direction, it may damage the crease line or outer paper. Always check the folding direction before applying pressure.
Pressing Too Hard
Rigid board is strong, but the surface paper can still be damaged. Press gently and evenly, especially on printed or textured surfaces.
Poor Corner Alignment
Uneven corners make the box look low quality. Take time to align the corners before securing the panels.
Removing Adhesive Film Too Early
If the box uses adhesive strips, do not remove the protective film before the panels are ready. Exposed adhesive may collect dust or stick to the wrong area.
Ignoring the Insert
Good packaging depends on both inside and outside. The insert also matters. A loose or poorly placed insert can reduce product protection and presentation quality.
Tips for a Professional Finished Look
To make the assembled box look more premium, follow these simple tips:
- Assemble the box on a clean table.
- Keep hands clean to avoid fingerprints.
- Fold panels slowly along the crease lines.
- Align all corners before fixing them.
- Press adhesive areas evenly.
- Make sure the insert is flat and centered.
- Place the product neatly inside.
- Check the lid closure before final packing.
For brands, consistent assembly quality is important. If many boxes need to be assembled, it is helpful to train workers with a standard assembly process.
Benefits of Easy Assembly
The easy assembly feature is one of the biggest advantages of collapsible rigid boxes. It helps brands improve packaging efficiency while reducing storage and shipping pressure.
| Benefit | Explanation |
| Space saving | Boxes can be stored flat before use |
| Lower shipping volume | Flat-packed boxes take less space |
| Flexible inventory | Easier to store large quantities |
| Premium appearance | Looks like a luxury rigid box after assembly |
| Simple operation | Can be assembled without complex tools |
| Better user experience | Suitable for gifts, retail, and e-commerce |
For international brands, collapsible rigid boxes are especially practical because packaging volume can strongly affect freight cost. Flat shipping makes the packaging more economical while still keeping a high-end look.
When Should You Use a Collapsible Rigid Box?
A collapsible rigid box is a good choice when you need both luxury presentation and logistics efficiency.
It is especially suitable when:
- You need premium gift packaging.
- You want to reduce shipping volume.
- You have limited warehouse space.
- Your products are sold internationally.
- You need customized branding.
- You want a better unboxing experience.
- You need packaging that is easy to assemble.
However, for extremely heavy products or packaging that must be ready to use immediately, a traditional rigid box may still be more suitable. The best choice depends on product weight, budget, shipping method, and brand positioning.
For brands in cosmetics, gifts, jewelry, apparel, electronics, and luxury retail, collapsible rigid boxes are a practical and attractive packaging solution. They enhance customer experience and improve packaging efficiency.