
Keep lipsticks and mascaras aligned by controlling sideways movement, end-to-end travel and lift separately. Each tube needs supports matched to its body and stops matched to its length. A single long recess divided into equal strips may produce a tidy drawing while allowing the shorter pieces to wander.
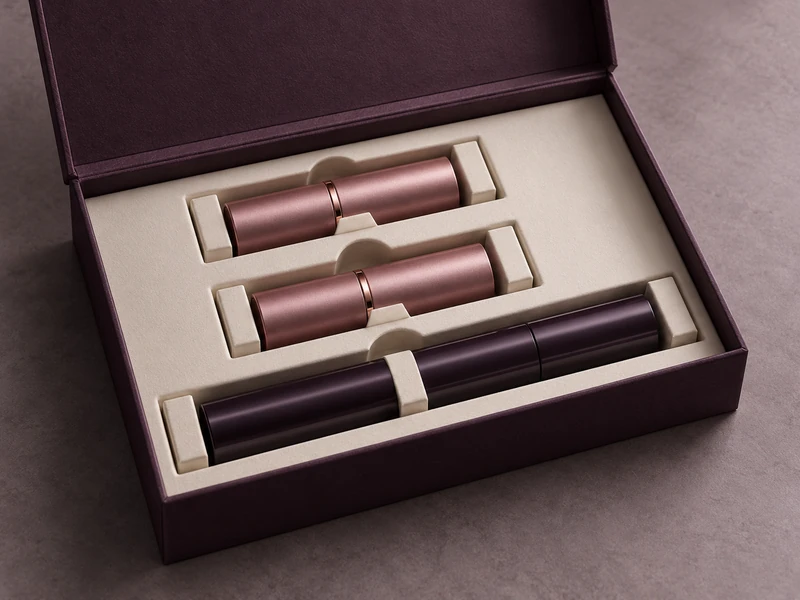
SevenRainbowpack’s cosmetic collection includes slim drawer and lid-and-base options for lipsticks, alongside taller formats for mascaras. In a mixed set, the challenge is making those different proportions read as one arrangement. The insert must create that order without using the lid to press everything flat.
Choose What “Aligned” Means Before Drawing the Tray
Pick a visible reference: tube centers, one end of the cases, or the positions of their printed names. Those choices produce different layouts when a mascara is substantially longer than a lipstick. Trying to satisfy all three can make the spacing look accidental.
For example, two short lipsticks and a long mascara can share a left-hand starting line while ending at different positions on the right. That can look deliberate if the individual wells follow those lengths. Extending every well to the mascara’s end creates unnecessary travel for the lipsticks.
Make two trial layouts on plain card and photograph the closed products where the supports would sit. Use strips of spare paper to mark the proposed bridges, leaving the cap joints and shade names visible in the photograph. This quick mock-up shows whether the insert covers something the customer needs to read, which a drawing of the case outlines cannot reveal.
Where Should the Insert Hold Each Tube?
Use separated body supports so a tube cannot pivot freely around one small contact point. Locate them on sections that can tolerate contact and stay clear of cap joints, decorative collars and vulnerable print. Two supports close together may still allow the far end to swing.
Long mascaras particularly benefit from a considered span between supports. The goal is to restrain the body while leaving a central or end grip area accessible. Do not assume that increasing foam density or tightening the entire channel is the only route to stability.
SevenRainbowpack’s cosmetic rigid box options include paperboard, EVA, molded pulp and PET inserts. Compare their actual contact shapes, depth and assembly, rather than treating them as interchangeable materials with different appearances.
Can a Paper Insert Work in a Shallow Box?
Yes, where folded rails or shaped cradles can locate the cases within the available depth. Review the paper grain, fold spring and support beneath each contact area. A narrow folded wall can look straight when empty but lean when a tight tube is pressed into place.
Keep cut edges away from the product’s most visible finish. A covered bridge may be useful, but its thickness and position need to leave enough lid clearance. Inspect a wrapped, assembled sample rather than a flat die-cut sheet alone.
Give Short Lipsticks Their Own End Stops
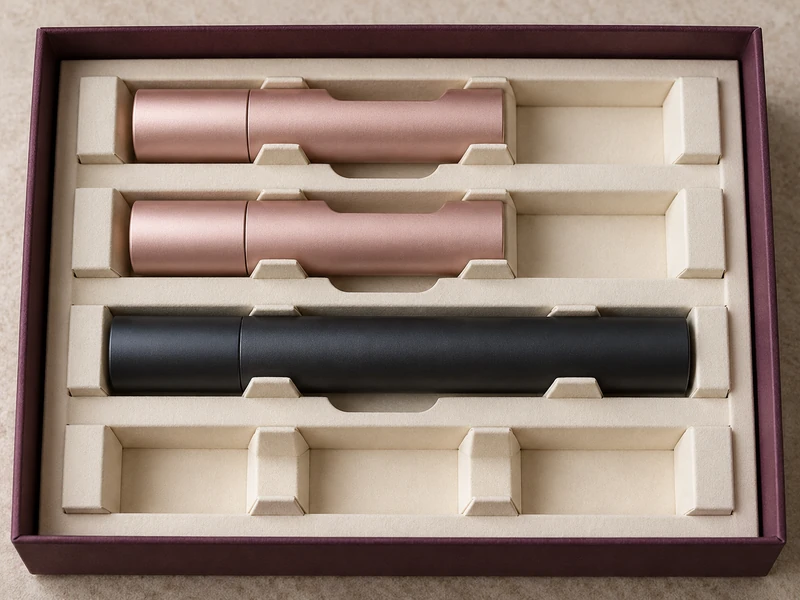
Set the stops around each product’s packed length. A shared long pocket allows a short case to slide even if its sideways fit is snug. The visible result is an uneven row; the hidden consequence may be repeated rubbing at the ends.
The illustrative detail below deliberately shows excess space beyond the short cases. The side supports establish parallel rows, but the distant stops cannot prevent lengthwise movement. Move the relevant stop inward or introduce a properly supported local spacer.
Leave a controlled allowance for product and insert variation, agreed from real samples. Avoid quoting one universal clearance for every lacquered, metalized or soft-touch case. A fit that works for one finish may scrape another, even when their nominal dimensions match.
| What Moves? | Likely Design Gap / What to Review |
| One end swings sideways | Supports are too close together or poorly located / Support span and contact shape |
| A short tube slides lengthwise | Stops follow the longest product / Individual well length |
| A tube rises out of its row | Insufficient local retention or excessive vertical space / Cradle depth and a gentle retaining feature |
| Printed names rotate out of view | Round body is free to turn / Orientation restraint or a revised display expectation |
Does a Round Tube Need to Keep Its Printed Face Up?
If the printed name must remain visible, specify rotational orientation as a separate requirement. A round tube can stay perfectly parallel to its neighbors while rolling enough to hide its logo. An end stop does not solve that movement.
A shaped case may offer a flat or another suitable locating feature. A fully round case may need a gentle band, sleeve or carefully tested contact arrangement. If reliable orientation would require excessive friction, consider whether the insert can carry the shade information instead.
Keep the brand’s artwork team involved here. A label position that looks ideal on the loose product may sit directly under the necessary support in the gift set. Moving the support and moving the label are different project decisions with different owners.
Why Should the Lid Stay Out of the Holding System?
The lid should close without bearing on the tube caps or forcing a high product down into the insert. Otherwise variations in case diameter, insert height or wrapping thickness can alter both closure and removal. Pressure can also shift an item as the lid opens.
SevenRainbowpack’s custom two-piece rigid boxes allow base depth and lid coverage to be considered with the insert. Use the closed sample to verify the space above the tallest loaded point, including any paper bridge. The outside profile alone cannot confirm it.
A magnetic format introduces a separate flap movement. Our article on magnetic box flap coverage helps evaluate that reveal, but flap coverage should not substitute for product restraint inside the tray.
Leave a Grasp Area on the Body
Expose a useful section of each closed case so the recipient can lift it without pulling on the cap. A central finger recess can work well if the supporting points sit far enough apart. Check the longest tube and the shortest case individually.
Do not create a large shared opening that removes the divider between neighboring items. Retain enough separation to prevent cases touching during lifting and repacking. If the set contains a delicate applicator or tool, our guide to protecting beauty tool heads offers a related reason to choose body-level contact points carefully.
Inspect Alignment After Handling, Before Straightening Anything
Record the starting positions, close the box and handle the complete pack under the project’s agreed conditions. Reopen it where the contents can be photographed immediately. Do not let the person opening the sample instinctively nudge each tube back into line.
Check parallelism, lengthwise travel, rotation and finish marks separately. Removing one tube should not pull up its neighbor or collapse a shared paper rail. Repeat the review after repacking to see whether the arrangement depends on a factory-perfect loading technique.
For shipping validation, select a test relevant to the actual distribution route. ISTA distinguishes preliminary screening from transport simulation procedures; a quick hand shake is not equivalent to either formal procedure. Agree the test with the appropriate lab and include the intended outer packaging.
What Belongs in the Production Approval?
Provide SevenRainbowpack with the full product set, dimensional variation where available, the chosen visual reference and the surfaces that may accept contact. Note whether printed faces must retain their orientation and which component should be removed first. Include any protective sleeves used on the packing line.
Use the sample stages to settle the geometry first and the real finish interaction afterward. Keep an approved loaded photograph alongside the physical sample. That makes “aligned” a reviewable condition rather than an impression remembered from an early rendering.
Plan for Shade Variants and Product Substitutions
A collection may use similar-looking cases from different component batches or suppliers. Compare the actual extremes available, including decorative collars and raised end labels. Do not let the first handpicked sample become the only fit reference.
If a seasonal bundle replaces one lipstick with a narrower liner, use a revised local carrier or insert component that locates it properly. Leaving the old channel unchanged can break the rhythm of the whole set. The exterior can remain consistent while the product seat changes.
Keep a simple loading photograph with cap direction and shade order visible. It helps distinguish movement during handling from an item packed in the wrong position. When a sample returns with one case out of line, that distinction makes the next revision much more specific.