
Artwork crossing a fold can distort, crack, or disappear once a collapsible rigid box is assembled. Logos, text, patterns, and decorative finishes need careful placement before bulk printing begins.
How Fold Lines Affect Print Quality in Collapsible Rigid Boxes?
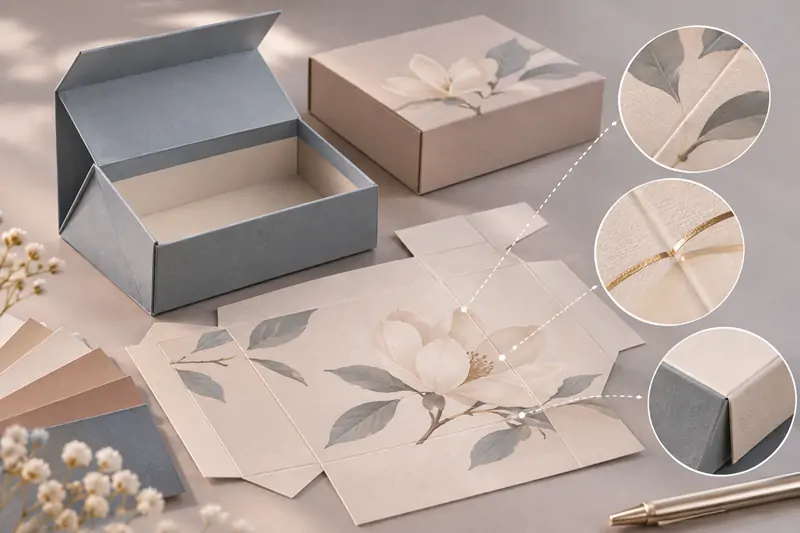
Unlike ordinary folding cartons, foldable rigid boxes combine thick greyboard panels with decorative wrapping paper. Grooves and flexible connections allow the boxes to ship flat and take shape during assembly.
The printed surface must follow these movements. Fine lettering can become distorted, while narrow borders, foil details, or surface coatings may show damage near frequently used hinges.
Three factors influence the final appearance:
- Fold Direction: Determines how the printed wrapping paper bends during assembly.
- Panel Movement: Affects the position and alignment of graphics after folding.
- Surface Finish: Influences whether printed details crack, wrinkle, or remain intact.
Seven Rainbow’s custom collapsible rigid boxes include one-piece, side-wing, double-side-wing, and two-piece constructions. Each requires artwork placement suited to its folding structure.
Where Should Artwork Avoid Fold Lines?
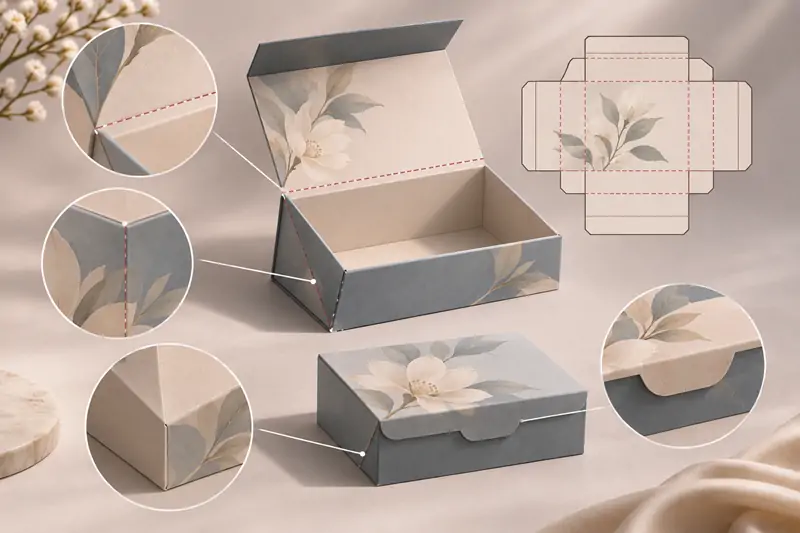
The most sensitive areas are not always visible in product photographs. Before arranging graphics, check the collapsible rigid box dieline to locate hinges, movable panels, corner connections, and overlaps.
Lid-to-Back-Panel Folds
On a foldable magnetic gift box, the lid hinge moves whenever the box opens or closes. Small lettering and delicate foil details crossing this connection may become distorted.
For better results:
- Center logos on the flat lid surface.
- Keep narrow metallic lines clear of the hinge.
- Test background graphics extending across the fold.
Side-Wing Folding Areas
Side-wing and double-side-wing boxes use movable panels to form their walls. Continuous stripes or printed borders may appear uneven where adjoining sections meet.
A practical layout should:
- Keep detailed artwork within individual panels.
- Avoid thin borders crossing wing hinges.
- Check pattern continuity after assembly.
Bottom-Panel and Corner Connections
Depending on the construction, bottom panels may contain angled folds or overlapping sections. Large illustrations can become partially hidden when the box is assembled.
For a clean rigid box layout, keep product names and detailed graphics on visible surfaces. Folding corners are better suited to simple colors or patterns requiring little alignment.
Front Flaps and Closure Edges
Magnetic, snap-lock, ribbon, and hook-and-loop closures affect how the front of a box appears. Some printed areas may disappear beneath a flap or overlapping panel.
Before approving artwork for custom magnetic boxes with logo, check:
- Is the logo completely visible when closed?
- Does the artwork cross an active flap hinge?
- Will closure components cover printed details?
Which Printed Elements Need the Most Clearance?
Not every printed element requires the same distance from a fold. Background colors may extend across hinges, while small text and narrow decorative lines need more protection.
A simple graphic can tolerate minor surface changes. Detailed artwork is less forgiving, especially when rigid box printing involves fine lettering, precise borders, or metallic finishes.
| Artwork Element | Potential Problem | Suggested Placement |
| Small text | Distorted lettering | Flat panels, away from hinges |
| Logos | Bent or interrupted shapes | Stable, visible surfaces |
| Thin borders | Broken or uneven lines | Clear of moving joints |
| Solid colors | Cracking or surface variation | Across folds only after testing |
| Photographs | Distorted image details | Main images on flat panels |
| Repeating patterns | Corner misalignment | Adjusted to assembled panels |
| Foil graphics | Cracking or uneven reflection | Away from active folds |
Consider a cosmetics gift box featuring a floral background and a gold foil logo. The floral design may continue across multiple panels without requiring exact alignment.
For custom rigid boxes with logo, positioning the logo on a flat lid helps preserve its shape and avoids unnecessary bending whenever the box opens.
How Different Collapsible Box Structures Affect Artwork Layout?
A print layout that works on a rectangular magnetic box may not suit a side-wing or hexagonal design. Each construction changes where the wrapping paper bends and overlaps.
For custom foldable rigid boxes, the artwork must follow the selected assembly method. The visible surface area, folding direction, and position of connecting panels can vary considerably.
- One-Piece Foldable Gift Boxes:Keep large illustrations on uninterrupted surfaces. Avoid small details where locking tabs, hinges, or folded sections meet.
- Side-Wing Opening Gift Boxes:Position important graphics within individual wall panels. Check repeating patterns once the side wings are secured.
- Double-Side-Wing Foldable Boxes:Identify the outermost visible surfaces. Reinforced wings may conceal printed details beneath overlapping sections.
- Two-Piece Foldable Gift Boxes:Review the lid and base separately. A two piece rigid box dieline should show both components and their folding positions.
- Triangular and Hexagonal Collapsible Boxes:Divide detailed artwork between individual faces. Angled folds can interrupt continuous borders or geometric illustrations.
For more complex rigid box packaging design, inspect the assembled sample from several angles. A graphic centered on the flat drawing may not appear balanced on the finished box.
How Printing and Finishing Methods Influence Fold-Line Placement?

The printing method matters, but surface finishing often has a greater influence on artwork near folds. Some finishes remain flexible, while others may show visible damage during bending.
Seven Rainbow’s custom rigid box printing and finishing options include CMYK/Pantone printing, silk screen printing, foil stamping, embossing, debossing, lamination, soft-touch finishes, and spot UV.
CMYK and Pantone Printing
CMYK printing suits photographs and multicolor graphics, while Pantone printing helps maintain specified colors. Both can support artwork extending across different panels.
Check the following:
- Large dark areas for visible fold cracking
- Fine color boundaries near grooves
- Pattern alignment between adjoining panels
Foil Stamping and Embossing
Gold or silver foil adds emphasis to logos, while embossing and debossing create textured designs with raised or sunken surfaces. These effects are more vulnerable when placed across active hinges.
When applying decorative finishes to custom rigid boxes:
- Keep metallic logos on flat surfaces.
- Avoid thin foil lines crossing hinges.
- Position embossing clear of folding grooves.
- Check foil adhesion after repeated opening.
Spot UV and Surface Lamination
Spot UV highlights selected graphics with a glossy coating. Matte, gloss, and soft-touch lamination cover broader areas, creating different visual and tactile effects.
Research published in North Carolina State University’s BioResources journal examines how UV-curable coatings influence printed paperboard’s folding performance. Actual results depend on the materials and coating formulation.
For collapsible rigid boxes, sample testing should focus on:
- Coating cracks along bending areas
- Lamination lifting near repeated folds
- Surface marks on dark printed panels
- Changes in gloss around hinged sections
Kraft and Specialty Wrapping Paper
Coated paper generally provides a smooth surface for detailed printing. Kraft and specialty papers introduce different textures that can influence how fine artwork appears.
When selecting rigid box packaging material, consider:
- Coated Paper: Suitable for detailed graphics and multicolor printing.
- Kraft Paper: Best checked for fine print clarity and ink appearance.
- Textured Paper: May affect narrow lettering and decorative finishes.
- Specialty Paper: Requires testing for both print reproduction and folding performance.
Artwork File Preparation for Printed Collapsible Rigid Boxes
A print-ready file should follow the approved structural dieline, not estimated dimensions from a product photograph. Even a small mismatch can shift artwork into a fold.
A generic collapsible rigid box template may help with early design planning, but its folding positions and wrapping allowances may not match the actual production structure.
Before submitting production files, verify these six details:
- Confirm the Dieline: Use the approved foldable rigid box dieline with correct cutting lines, fold positions, and panel dimensions.
- Separate Artwork Layers: Keep logos, background graphics, text, and decorative finishing areas clearly identified.
- Set Safe Margins: Position essential artwork away from folds according to the selected board and wrapping paper.
- Extend Background Printing: Include required bleed and wrapping allowances without placing important details in concealed areas.
- Check Artwork Orientation: Make sure side-panel graphics and text face the correct direction after assembly.
- Verify Finishing Positions: Match foil, embossing, and spot UV areas to the final printed layout.
When using a rigid box design template, confirm that its panel proportions match the approved rigid box dimensions. Changes to box depth or flap length may also change artwork placement.
The prepress artwork preparation guide hosted by City Tech recommends preparing dielines around the intended paper and folding requirements rather than using an unsuitable layout.
What Should Be Checked During Physical Sampling?
A digital mockup can show artwork placement, but it cannot reproduce the actual movement of printed wrapping paper. Physical samples reveal problems that flat previews may miss.
A collapsible rigid box mockup is useful for checking overall appearance. However, samples made with the intended printing, wrapping, and finishing materials are needed to evaluate fold-line performance.
Artwork and folding inspection checklist:
- First Assembly: Check printed details as the panels fold into position.
- Repeated Folding: Inspect hinges for cracking, wrinkles, or surface lifting.
- Printed Borders: Look for visible breaks where adjoining panels meet.
- Foil and UV Finishes: Check adhesion and appearance after opening and closing.
- Closure Alignment: Confirm that flaps and wings do not conceal logos or text.
- Flat-Pack Condition: Inspect the printed surface after flattening the box again.
For buyers sourcing collapsible gift boxes wholesale, sample approval is particularly important. An artwork problem discovered after mass production can affect the entire order.
If a defect appears, identify whether it comes from artwork placement, material selection, or the folding structure. Moving a graphic may solve the problem without changing the box construction.
Example: Artwork Placement on a Foldable Magnetic Gift Box

Consider collapsible gift boxes with magnetic closure designed for a skincare set. The artwork features a floral background, a gold foil logo, and a narrow border around the lid.
The background can cover several panels, while the logo and border need more careful positioning. Their locations should follow the approved folding structure.
| Box Area | Artwork Arrangement |
| Top Lid | Center the foil logo on the flat surface |
| Rear Hinge | Avoid small text and narrow foil details |
| Front Flap | Keep borders clear of the folding connection |
| Side Wings | Use patterns that tolerate minor misalignment |
| Bottom Panel | Avoid important graphics near hidden overlaps |
Once assembled, check the logo position with the lid closed. Then open and flatten the box to see whether the decorative details remain intact.
For magnetic rigid box packaging, full-flap and half-flap designs provide different visible printing areas. Review Seven Rainbow’s custom magnetic rigid box options before fixing the logo position.
Printed collapsible rigid boxes need artwork that works in both flat and assembled positions. Keep important details away from folds, test decorative finishes, and approve physical samples before production.
Explore Seven Rainbow’s custom collapsible rigid box options to discuss folding structures, printing layouts, and sample requirements for your wholesale packaging project.