
Packaging a beauty tool with a delicate head requires a deliberate support map: hold the robust parts of the tool, leave vulnerable surfaces free from pressure and give the user a safe place to grasp it. A precisely shaped outline is not enough if the insert loads the bristles, roller joints or treatment surface.
Seven Rainbow’s cosmetic range includes beauty-tool packaging alongside bottles, jars and gift sets. For tools, the design conversation needs to move beyond “foam or paper insert” and identify exactly which surfaces may touch the pack throughout packing, transport and removal.
Which Parts of This Tool Should Meet the Insert?
Begin with the handle, body or another manufacturer-approved support area. Treat the head as a region to assess separately, particularly where fine bristles, soft silicone elements or a moving joint are involved.
A facial brush and a stone roller should not receive the same cavity simply because their overall dimensions are similar. The brush may need a clear pocket around its bristles; the roller may need clearance around both the stone and the frame connecting it to the handle.
Ask the product team to mark permitted contact zones on a photograph or drawing. Include switches, decorative coatings, charging contacts and any surface prone to visible impressions.
This information gives Seven Rainbow a meaningful starting point for a custom cosmetic rigid box . Without it, a tightly fitted sample can appear reassuring while directing pressure into the least suitable part of the product.
Should the Insert Grip the Head to Prevent Movement?
Only if the tool’s requirements support that contact. A delicate working surface should not become the default restraint simply because its shape is easy to capture.
Instead, consider two separated supports on a robust handle or body, with enough control to limit rotation. Check the assembled tool under movement: a free head can still strike a cavity wall if its handle is allowed to pivot too far.
How Much Clearance Does the Head Need?
Clearance must account for variation and movement, not just the nominal outline. The head should remain separated from the lid, sidewalls and neighbouring accessories under the agreed handling conditions.
Measure the full envelope of the assembled tool, including bristle spread, protective caps and any angled or articulated position used for packing. A roller that turns slightly in its cavity can occupy more space than a front-view drawing suggests.
Do not adopt one universal clearance number for all heads. The required space depends on the head’s sensitivity, the restraint around the body and the behaviour of the finished insert.
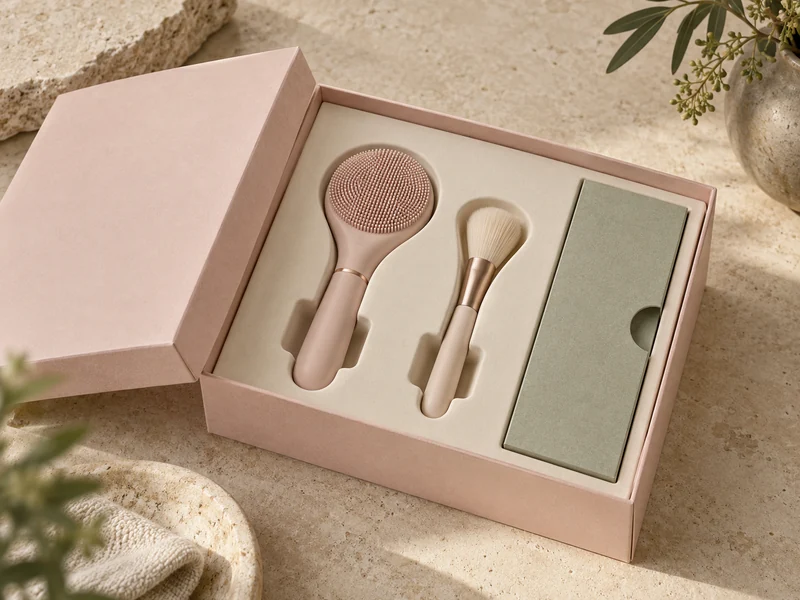
For an illustrative layout, a broad recess around a brush head can be paired with close-fitting handle seats. That creates a visible distinction between the protected working area and the areas doing the locating.
What About the Space Under the Lid?
Review the complete vertical stack with the tool fitted. The visible insert surface is not necessarily the highest point once a curved head, protective cap or instruction card is added.
A soft lining should not be assumed harmless when it rests on bristles. Light pressure sustained in storage can still be incompatible with the tool’s intended condition, so the product owner should confirm acceptable contact.
Which Insert Material Fits the Contact Requirements?
Select the insert by its function and surface interaction, then refine the appearance. Seven Rainbow lists paper, EVA, foam and fabric-lined options across its rigid-box offering, but each proposed assembly needs to suit the particular tool.
A paperboard insert can create clean folded supports and a restrained presentation. It needs careful edge positioning where the tool has a glossy coating or a narrow handle.
A foam-based insert can accommodate a shaped cavity, but cavity depth and grip should be resolved rather than simply tracing the product tightly. If it is fabric-lined, check the lining seams and adhesive areas as part of the finished contact surface.
| Design Question | What to Review |
| Where Does the Tool Touch? | Approved body zones, edge contact and surface marks |
| What Prevents Rotation? | Support spacing and cavity geometry |
| What Must Remain Clear? | Head, joints, controls and sensitive finishes |
| How Is It Removed? | Finger space and lift direction at a robust part |
Use a finished-material sample to check surface compatibility. A white structural prototype can confirm geometry, but it cannot establish how a coloured lining or final wrapped edge behaves against the tool.
Can the Customer Lift the Tool Without Touching Its Head?
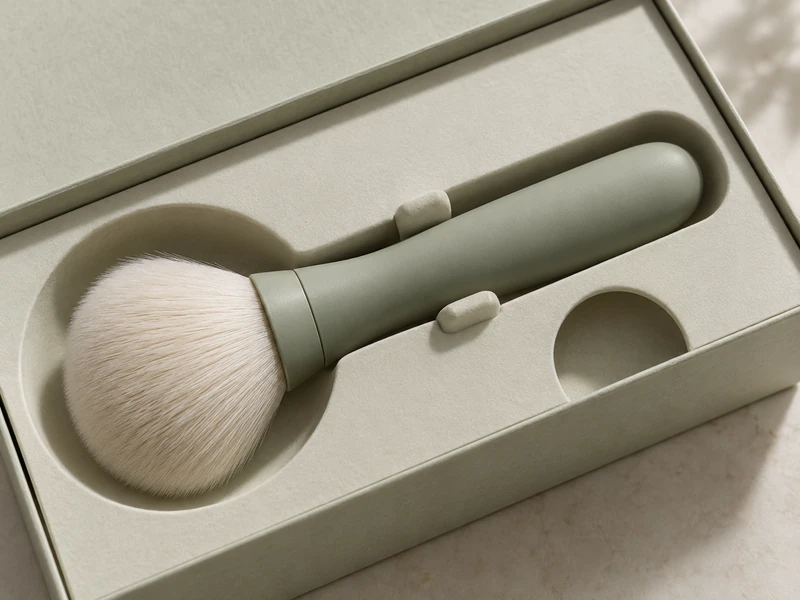
Provide obvious finger access beside the handle or main body. The best protected head can still be damaged if the only visible way to remove the tool is to pull on that head.
Invite a tester who has not received the layout instructions to take the tool out, and observe their first choice of gripping point. Watch where their fingers naturally go before explaining the intended method.
A recess may need to be wider, moved to the opposite side or paired with a broad lifting ribbon. If a ribbon is used, position it so lifting does not drag a delicate head against the edge of its pocket.
Seven Rainbow’s article on easier opening details provides useful context for this part of the brief. Access is a structural requirement, not a finishing touch added after every other dimension is fixed.
Does the Outer Box Leave Enough Working Room?
A book-style rigid box can expose the tool and an inner-cover guide together, but the cover must rest where it does not obstruct the lifting hand. Check that position on the surface where the customer is likely to open the kit.
For a drawer format, determine how far the tray must extend before the handle can be grasped. A carefully shaped insert is of limited benefit if the sleeve still blocks access.
Are Accessories Creating Hidden Contact Risks?
Separate replacement heads, cables and small attachments from the main tool’s vulnerable areas. An accessory that looks tidy in an open sample can move into the head pocket when the box is tilted.
A cable should have its own defined space rather than being folded over the tool. Loose plugs and connectors need particular attention near polished surfaces and soft working heads.
If the kit includes a removable head, confirm whether it travels attached or separately. That decision changes both the cavity and the user’s first assembly step.
Use the inner cover or a dedicated card location to explain the sequence without placing printed material across the protected head. Seven Rainbow’s cosmetic gift-set presentation article explores how packaging can make a routine feel coherent; the accessory layout should make that routine straightforward to begin.
What Must the Sample Prove Before Approval?
The sample should show that the tool stays located, its head remains clear and removal is manageable. Review those outcomes with the actual tool and all supplied components.
Check the sensitive areas after the agreed handling sequence, looking for displacement, rubbing, bent elements or unintended contact. Agree on the product’s acceptance criteria with its manufacturer rather than relying on the absence of obvious external damage.
For distribution validation, select a method appropriate to the complete packed system. Clemson University’s Package Dynamics Lab describes work on protective packaging and distribution forces, reinforcing the need to assess product and packaging together.
Practical opening trials and formal transport testing answer different questions. Both may be needed when a delicate tool must arrive in good condition and remain easy to take out.
Does Returning the Tool to the Box Change the Requirements?
If the box is intended for storage, test replacement as deliberately as first removal. A customer may return the tool at a slight angle, with an accessory fitted or with the cable arranged differently from the original packing.
The insert should make the correct position understandable. A handle seat that accepts several misleading orientations can let the head contact an edge even though the original factory-packed position was safe.
Keep the storage instruction consistent with the product manufacturer’s guidance. In particular, do not imply that the decorative gift box is a drying or cleaning accessory unless the tool and package have been designed for that use.
A reusable layout may justify a more forgiving lead-in around the handle and a clearer accessory pocket. Evaluate those details with the same finished surfaces that the customer will encounter.
What Should the Approval Record Contain?
Keep the tool version, contact-zone drawing, insert material, cavity layout and accepted sample together. A later change to the head or handle can invalidate a fit that was correct for the original version.
Seven Rainbow’s sample comparison guide helps organise that progression. Use early samples to settle the support map and later samples to confirm surfaces, printing and the complete opening experience.
When these six decisions are resolved, a beauty-tool box can feel quiet and effortless. The generous space around the head then reads as intentional protection, while the support doing the difficult work stays discreetly beneath the product.