
Bottle volume describes how much fragrance a bottle holds; it does not describe the space the finished bottle occupies. A perfume box must be sized around the bottle’s external geometry, cap, weight, insert, removal space and closing clearance. Two bottles marked 50 ml can therefore require very different packaging.
Seven Rainbow’s perfume packaging brief asks for bottle size, weight and cap shape as well as quantity and preferred structure. Those details are not secondary information: they establish the physical envelope from which a workable rigid box can be developed.
Why Can Two Bottles With the Same Volume Need Different Boxes?
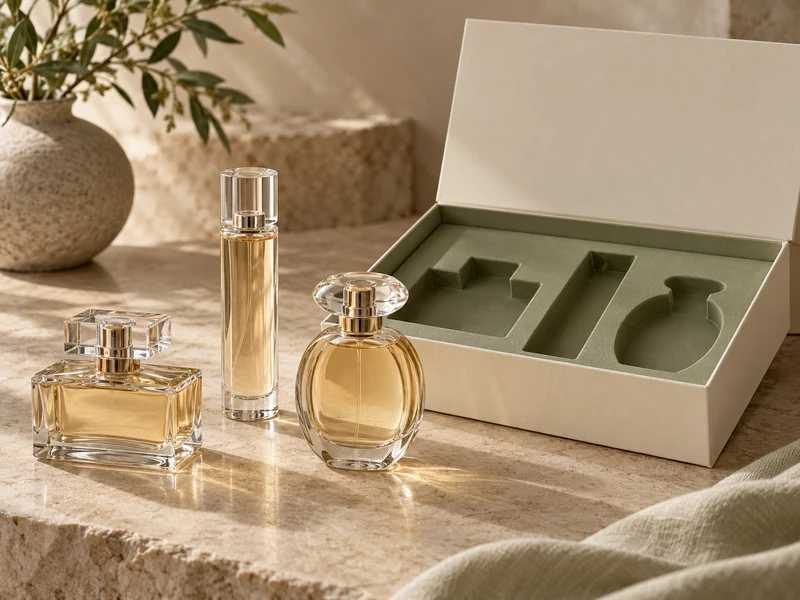
The glass can distribute the fragrance across a wide, shallow body or a tall, narrow one. Thick walls, a substantial base and a sculpted outer profile add dimensions without increasing the stated fill volume.
Then consider the cap. A broad decorative cap can be wider than the bottle body, while a tall cap can set the overall height even when the glass itself is compact.
A request for “a 50 ml perfume box” therefore leaves the controlling dimensions unknown. It may be enough to start a conversation, but it is insufficient for approving an insert or a production dieline.
The Seven Rainbow perfume rigid box range covers different bottle shapes and gift-set arrangements. That breadth is precisely why the package should follow a measured bottle rather than a standard volume label.
Which Bottle Dimensions Should Be Supplied?
Send the maximum external length, width and height of the bottle in the condition in which it will be packed. State whether the measurements include the cap, collar and any decorative attachment.
For an irregular bottle, a single front-view rectangle is insufficient. Supply side and top views, or a suitable drawing that shows protrusions and changes in profile.
Identify the intended orientation too. A bottle presented lying down may need a different insert footprint and removal movement from the same bottle presented upright.
- Finished bottle dimensions with the intended cap fitted.
- Maximum cap width and height, including projecting details.
- Filled bottle weight and any noticeable weight concentration.
- Shape information for the base, shoulders and neck.
- Permitted contact areas and surfaces to keep clear.
- Representative physical bottles for sampling.
Should You Measure an Empty or Filled Bottle?
The external dimensions may be the same, but the loaded weight changes how the insert and base are assessed. Use a representative filled product, or an agreed equivalent, for the mechanical review.
A heavy glass base can make a small bottle behave quite differently from a light bottle with the same outer dimensions. Its support should be developed around that actual load.
How Does the Insert Change the Required Size?
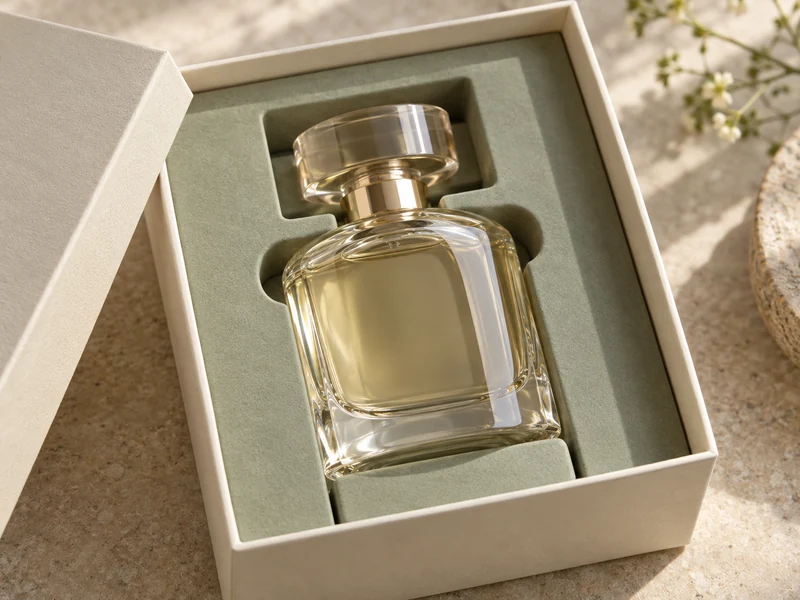
The insert adds its own structure around and beneath the product. Its walls, support platforms, wrapped surfaces and access recesses all occupy space.
A bottle outline cut into a flat surface does not tell the whole story. The design also needs to control depth, rotation and the direction in which the bottle is lifted.
For a broad cap, the insert may need a relief pocket that leaves the cap clear while locating the body. For a curved bottle, supports may need to engage selected body areas rather than squeezing an entire perimeter.
Establish support and access first; distribute extra space only where those functions or the assembled construction actually require it. First identify what the insert must do, then allocate space to the material and geometry that perform those jobs.
Where Does the Product Cavity End and the Finished Box Begin?
The cavity is the usable space inside the package; the external size includes the construction around it. A rigid board wall, wrapped edge, mounted tray or spine contributes to the finished outer dimensions.
State which dimensions are being quoted on every drawing. Otherwise, a buyer may approve an external measurement believing it represents the usable product space.
| Dimension Layer | What It Describes | Common Omission |
| Product Envelope | The complete capped bottle in its packing orientation | Cap overhang or projecting decoration |
| Insert Envelope | Supports, cavities and removal access | Material beneath the bottle |
| Usable Box Interior | Space available for the assembled insert and contents | Inner lining and closure clearance |
| Finished Exterior | The complete closed rigid box | Board, wrap, cover and spine build-up |
A dimensioned section through the bottle and insert can make these layers much easier to discuss. It also reveals where a proposed reduction in box height would remove support or clearance rather than empty space.
Will the Bottle Clear Every Moving Panel?
The product must clear the moving parts during opening and closing. A bottle that fits an open tray can still interfere with a lid edge, neck wall or cover liner.
In a shoulder-neck format, the visible neck also changes how much of the bottle is exposed and where fingers can reach it. A taller neck can frame the bottle beautifully while making a low-set body harder to grasp.
With a custom shoulder-neck rigid box, confirm the bottle position, neck profile and lid engagement together. The millilitre marking cannot supply those relationships between bottle, neck, insert and lid.
A drawer format introduces another check: the tray must open far enough to permit a safe lift. Placing the bottle close to the sleeve’s rear wall can make the nominally generous cavity feel surprisingly inaccessible.
Where Should the Customer Grasp the Bottle?
Plan access at the bottle body or another suitable lifting area, rather than making the cap the only available handle. A removable cap may detach before the bottle leaves a tight insert.
Finger recesses should be tested with the actual bottle and its finish. A slippery rounded body needs a different removal approach from a rectangular bottle with flat sides.
The package should make that approach apparent. If a tester repeatedly reaches for the cap, the access arrangement may need revision even if the written instructions describe a safer method.
Seven Rainbow’s gift-box opening details offer a useful companion to the dimensional brief. A slightly revised recess can sometimes improve the experience more than enlarging the entire box.
Can the Box Be Made Smaller Without Compromising the Presentation?
Often there is room to refine a layout, but reductions should follow a review of the support system. Remove unnecessary voids before cutting into functional material or product access.
A different packing orientation may reduce one dimension while increasing another. It can also change the opening story, label visibility and the way a heavy bottle loads its insert.
For a very wide cap, consider whether the surrounding presentation space can be organised more effectively. Do not simply compress the cap against a wall to achieve a smaller external measurement.
The visual side of this decision is explored in tactile perfume packaging. A compact box still needs enough room for its materials and reveal to feel deliberate, rather than cramped.
How Should a Size Request Be Written?
A useful request states the external product envelope and the intended use separately. For example: “One capped rectangular bottle, presented lying flat, with body access at both sides and an inner-cover fragrance card.” Add the measured dimensions and filled weight to that description.
Then ask the team to propose the cavity, insert and finished box dimensions as distinct values. This keeps the product data separate from the construction dimensions being developed around it.
If freight or shelf space imposes a maximum exterior size, state that constraint at the beginning. The team can then assess orientation and structure within a real boundary, rather than discovering after sampling that a visually successful box cannot fit its intended location.
Keep dimensions and units consistent across drawings and messages. A clear millimetre-based reference is more useful than several rounded conversions circulating between the bottle supplier, artwork team and packaging manufacturer.
What Should the Sample Review Establish?
The sample should establish fit, stable support, closure and removal with a representative product. Repeat the opening and replacement sequence, then inspect the bottle and insert for contact marks or movement.
Where shipping performance matters, assess the complete transport assembly rather than treating the rigid retail box as the whole shipping solution. The ISTA test-procedure overview provides a framework for selecting assessments according to the intended distribution environment.
A successful tabletop fit does not establish protection during vibration or impacts. Equally, a package that protects the bottle in transit still needs a usable retail opening.
How Should Changes Be Managed?
Keep the approved bottle and cap versions linked to the packaging drawing. A new decorative cap or a revised glass supplier can change the external envelope while leaving the fragrance volume unchanged.
Use Seven Rainbow’s white, printed and pre-production sample stages to check the relevant geometry and finished material combination. Revisit fit when the product changes, rather than assuming the old “50 ml box” remains suitable.
The most useful enquiry starts with the bottle, not the millilitres: dimensions, weight, cap, orientation and intended opening. Once those are clear, the box size becomes a reasoned outcome of the design.